Making the switch from Engineer to AI Engineer

I’ve recently made the switch from being classed as an “Engineer” to an “AI Engineer”. A lot of things are the same and a lot of things are different. Basically there are a lot of things. To make that switch I had to learn a lot of AI specific concepts that I wasn’t currently using in my day job.

I know a lot of people are in the same boat and are wanting to make that change (or want to future proof themselves in their current role). I created a PDF covering the concepts I learnt to make the switch and have been sharing it among friends and colleagues. It seems to be useful to other people so I’ve made it into a repo. https://github.com/rymawby/engineer-to-ai-engineer

The Significance of AI

One of my favourite uses of AI is making small tools to help me with my day to day work. I’d never have the time to whip these tools up before be now they can be created within minutes. They become almost throwaway at this point.

I wanted to be able to view how the size of test cohort and size of the control would affect the percentage value that would achieve statistical significance. Stats has never been my strong point but with AI I could quickly knock something visual up from the information I had at hand.

Statistical Significance App Screenshot

Managing Humans

One of the most important and rewarding things you can do in life is manage another human at work. You have the ability to make a massively positive impact on people. The impact isn’t just on the people you manage either. It impacts their family too. What they take home with them at the end of the day matters.

One of the main things I try to do as a leader is make people in the teams I manage excited to come into work each day. Everything else takes care of itself.

SaaSE - Social as a Side Effect

Last year I attempted to build in public - doing this alongside my full-time work and family commitments was tiring and in the end I couldn’t be arsed. It was annoying. Everything I was doing was being framed as “how can I package this up as content” or “how can I get people to engage with this”. It didn’t sit well with me and it was exhausting.

So I’ve been thinking if I could come up with a system to still be active on social, share things that may be useful to others but with the minimum of effort (I’m a big fan of minimal effort). With that I’m starting my own little SaaSE experiment - Social as a Side Effect - I’m going to be creating a system that automates and shares content that I would be creating for myself anyway and sharing it if it is even the tiniest bit interesting.

  • I already document and save links I find interesting to Pinboard - what if I automatically tweet the ones that I think others will find useful?
  • I already document some of the automations I use so I don’t forget - what if they can be useful to others? Could I share this documentation with a small amount of tweaking? Could the ideas I write down or journal about be shared?
  • I already summarise the books I read and take notes - what if these could be helpful to others?

So I’ve started that from today. In fact I wrote this in Obsidian and my system has shared to you without me doing a thing. Like I’m some kind of freakishly cool robot from the future.

Documentation As A Habit

I have made an automated system that produces content as a side-effect of my documenting procedures and processes. I’ve always wanted to share my writing but found it difficult to find time around my actual work. But what if I could use automation to create content from processes I already undertake within my work.

I document lots of things daily - whether it’s my thoughts in a journal, my work, books I’ve read or just my highlights from interesting passages within books. What if I could share these thoughts and writings when they are ready and when they could provide value to others.

Documentation can also be viewed as automation in itself. This is because it saves time by not having to answer the same questions multiple times. Documenting things within work can saave time for myself and others looking for the information.

I don’t know why this should defo work.

Using async Node.js with Bubble to create simple mini projects

I love the idea of using no-code tools to make mini-apps for your team (and other teams). I knocked together a quick video manifest parser using Bubble and Node.js. A developer could do this on the command line easily but I love being able to open up these type of tools to people who aren’t quite as technical.

This tutorial shows you how to create a Bubble plugin that uses server side actions.

What do we want to achieve here?

  • An app that we can pass in a url of a DASH or HLS manifest
  • The app outputs the parsed manifest to the screen

How are we going to do this?

  • Create a Bubble plugin that takes a url paramater input
  • The Bubble plugin should download the manifest from the url
  • The manifest should then be parsed using server side actions using either m3u8-parser (if HLS) or mpd-parser (if DASH).

Create a Bubble plugin

  • On Bubble go to My Plugins page and click New plugin
  • Name your plugin something catchy. I called mine manifest-parser. Super catchy.
  • Fill in your plugin general details.screencapture-bubble-io-plugin-editor-2020-09-24-14_56_16.png
  • On the Actions tab click Add a new action. Name your action in the popup. In the drop down for Action type select Server side. This is where you can start using the power of Node.js. Exciting. Screen Shot 2020-10-13 at 11.29.57.png
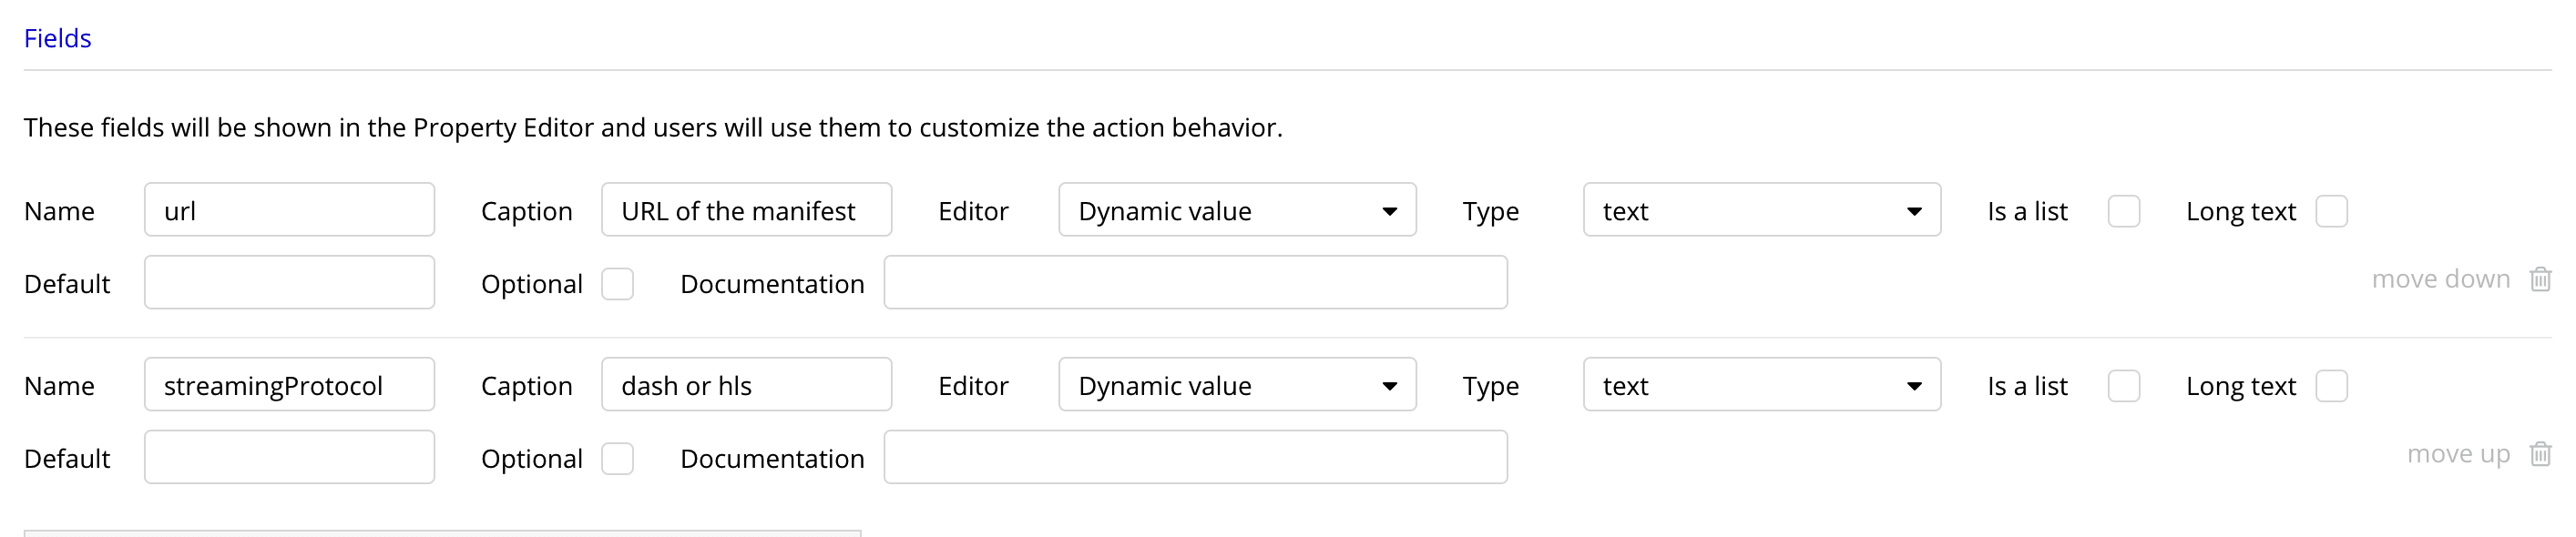
  • Now we need to pass a couple of parameters to our server code. These are going to be the url of the manifest and the streaming protocol (DASH or HLS). In our server code we will load the url and parse the data loaded with the respective parser (https://www.npmjs.com/package/m3u8-parser for HLS and https://www.npmjs.com/package/mpd-parser for DASH). Fill in the Fields section like this: Screen Shot 2020-10-13 at 11.33.17.png
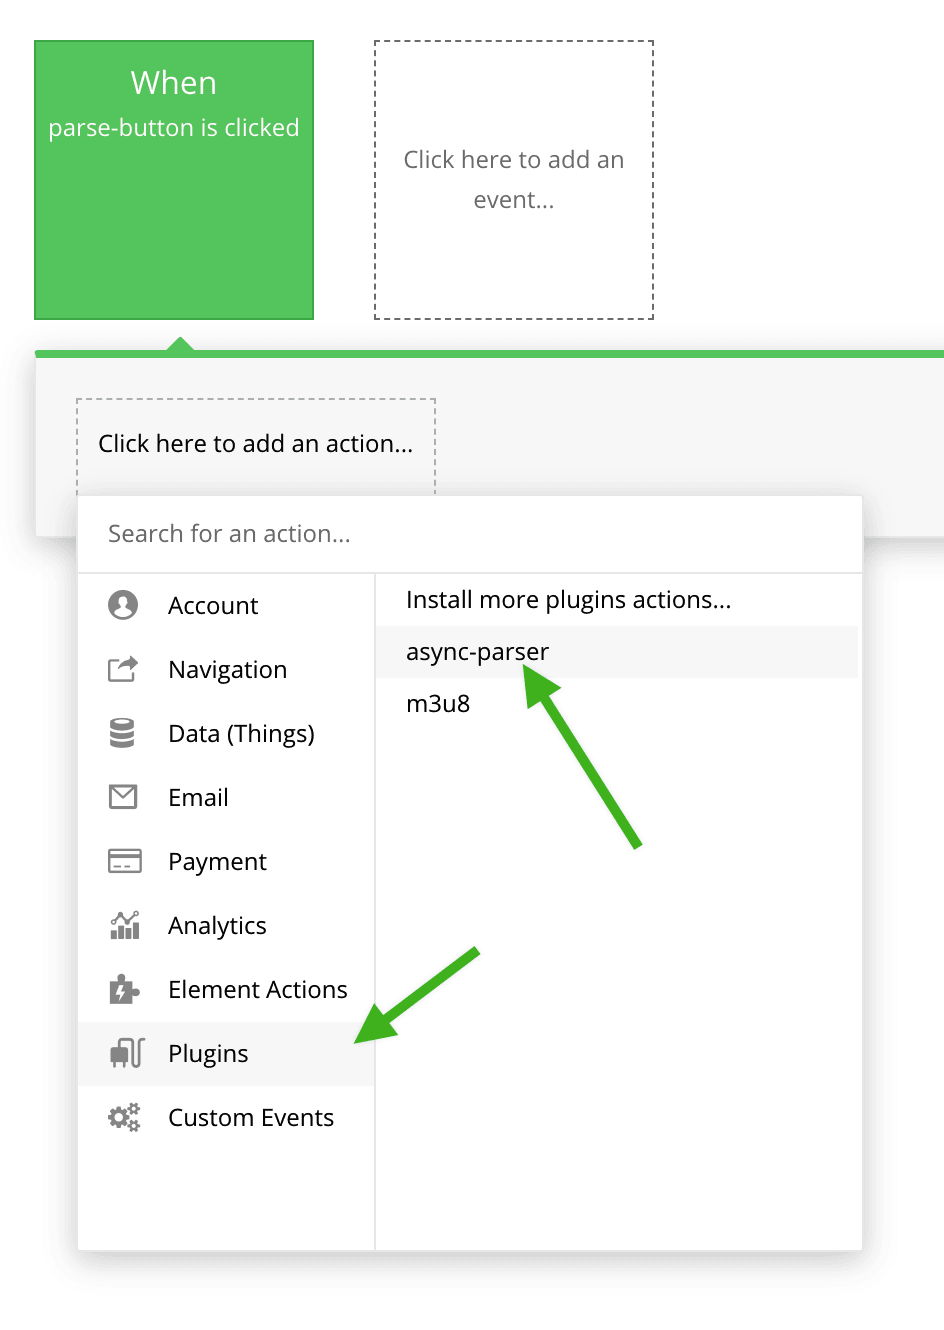
  • By doing this we are able to view these params in our test app. I have a Parse button, an input for the url and a dropdown to select HLS or DASH in my test app. Go to the app you are testing your plugin in and attach a workflow to a button. Now on the workflow you will be able to select your plugin from the Plugins menu. Beautifully illustrated here: Screen Shot 2020-10-13 at 11.40.55.png
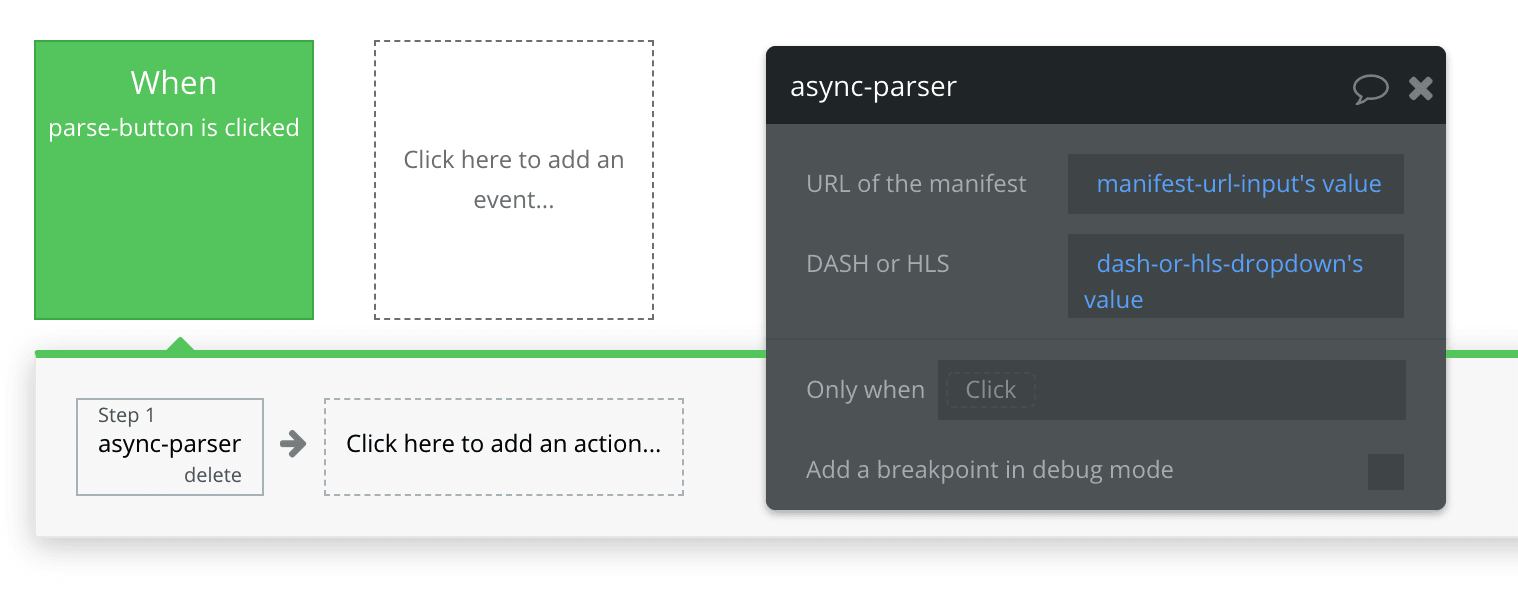
  • Now as part of the workflow I can pass in the values from my manifest URL input and the HLS/DASH dropdown, like so: Screen Shot 2020-10-13 at 11.45.36.png
  • Yes! Time for the fun part. Running the server side code and utilising Node.js packages. Hop back into your plugin project. In the Returned values section add a parsedManifest key to be returned (this will contain a string representation of our parsed manifest - I guess that was kind of obvious from the name) Screen Shot 2020-10-13 at 11.51.41.png
  • This is the bit that seems to trip people up - doing an asynchronous call from the run_server function. The below is the basic outline of how to do this. (you’ll notice your dependencies are automatically updated - make sure the This action uses node modules checkbox is checked).
function(properties, context) {

  const fetch = require('cross-fetch');
  var url = properties.url;
  let manifest = context.async(async callback => {
    try{
      let response = await fetch(url);
      let plainText = await response.text();
      callback(null, plainText);
    }
    catch(err){
      callback(err);
  }});
  return {parsedmanifest: manifest}
}
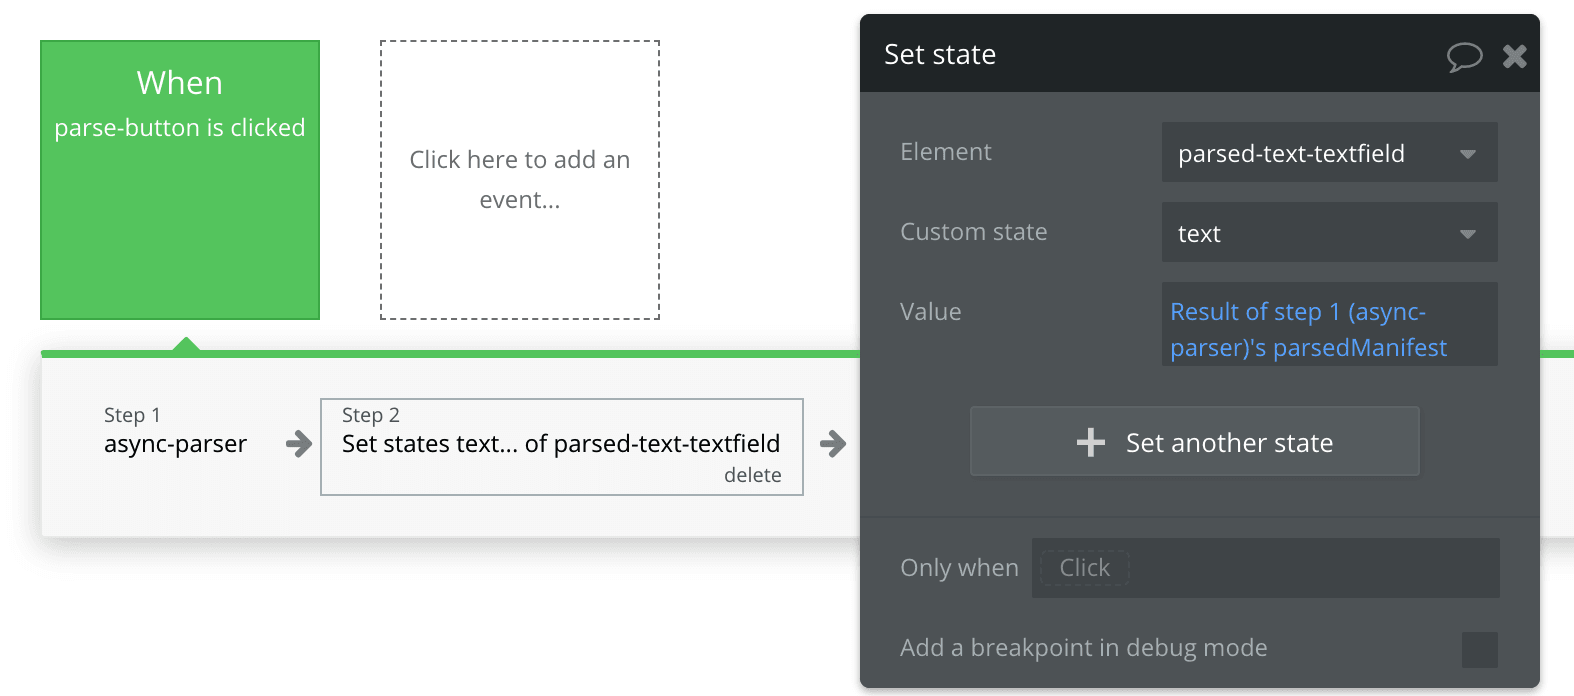
  • Now create a textfield in your test app. I use a custom state from the workflow to display the return value of the above: Screen Shot 2020-10-13 at 13.34.08.png
  • Hit Preview and run your app. Drop in any url and it’ll display the source as a string in the text box - magic! Now all we have to do is flesh out the server-side code a bit and we’re done. Update with the code below and try dropping in a manifest url and running the app.
function(properties, context) {

  var m3u8Parser = require('m3u8-parser');
  var mpdParser = require('mpd-parser');
  const fetch = require('cross-fetch');

  var url = properties.url;
  var isDashProtocol = properties.streamingProtocol === 'dash';
  let manifest = context.async(async callback => {
    try {
      let response = await fetch(url);
      let plainText = await response.text();
      if(isDashProtocol) {
        var parsedManifest = mpdParser.parse(plainText, url);
        callback(null, JSON.stringify(parsedManifest, null, 2));
      } else {
        var parser = new m3u8Parser.Parser();
        parser.push(plainText);
        parser.end();
        callback(null, JSON.stringify(parser.manifest, null, 2));
      }   
    }
    catch (err) {
      callback(err);
  }});

  return {parsedmanifest: manifest};
}
Mood

Forced remote - a tech leads guide to making the transition from the office to WFH

Over the course of the last month a lot of teams have gone from working in the office to working remotely. Teams have had to adapt quickly to the new situation and it’s nuances. This is my take on running a distributed team.

My current team was semi-remote - half of us were in the office, the other half spread across multiple timezones. I was based in the office so was involved in daily chit-chat about product and roadmaps - but since being remote I’ve noticed just how much of this I would’ve missed if I was remote. I’m currently dogfooding our remote culture and I’ve noticed a few places we’ve come up short.

The daily standup

Having people located across timezones meant we needed to have a standup time where everyone could attend - this was around 4pm everyday OT (office time). After reading this article by Jason Fried I proposed doing standup asynchronously over Slack - we did this for about 9 months. I was pretty happy with it - everybody got to update their days without being interrupted. The Slack channel was public so anyone else in the company who was interested could come and have a read.

Then I tried this async approach whilst being remote full-time. I had previously WFH one day a week but I hadn’t experienced being fully remote for any period of time. I found I missed interacting with the people in the office, I missed chatting and just connecting with my team mates. We’ve since implemented a standup/knowledge share/general hangout combo each day over Zoom at a time that is convenient for all - it generally lasts 15-30 minutes and in that time we let everyone know what we’ve been working and also discuss anything that comes up (we tend not to take it offline but talk it out there and then). So far the team likes it and the previously-fully-remote team members think it’s an improvement. This Zoom meeting is open to anyone in the business who is interested or who wants to discuss something with the team.

Slack etiquette

The way we use Slack hasn’t changed since we went into forced-remote mode. We try and use Slack asynchronously - we don’t expect answers right away. We have a pinned message setting expectations about the way we work: Ry slack message

I personally also turn off notifications and badges and minimise Slack whilst I am working. I also use encourage the use of Do not Disturb mode after hours (I tend to check-in in the evenings and people are able to force a notification to me if urgent).

Zoom/conference calls

Headphones with a mic is handy (rather than laptop speakers/mic) and we also mute when others are talking. I know## there is a bit of thought that everyone should not mute but get better headsets but I think with kids around due to homeschooling that might be tricky - I know it would be for me with my kids.

Managing your team

I’ve found the best way to manage a team remotely is similar to how I manage the team in house - giving trust and responsibilities whilst ensuring psychological safety for the team to discuss anything small or large. My team is awesome, they are skilled and driven. I bet yours is too. I’ve never been a bums-on-seats manager - If I can’t see you working then you aren’t working is not my style and would be hell in the current situation. I can imagine micro-managers aren’t having a great time of it currently.

LISTICLE TIME - top tools we use for remote work you might find useful

  • Slack
  • Zoom/Teams/Slack video/Google hangouts - video conferencing
  • Droplr - I use this every day for screenshots or sharing video
  • Zeplin - great for design teams to distribute designs and assets to devs
  • Decent headphones/mic
  • Jira or ticket tracking software so work is well documented and easy to pick up - this seems obvious for software teams but may be a new concept to those not in the software industry.
  • one of these for emergencies bat phone
Mood

How to use PUT or DELETE with a roUrlTransfer object in Brightscript

In any other languages using alternatives to POST and GET is a fairly simple operation. In Brightscript however using PUT and DELETE operations isn’t particularly well documented in the SDK docs.

To add PUT or DELETE we need to set the request type on our roUrlTransfer object. In a standard GET request you’d have something like this:

function httpGetRequest(url as String) as Object
 request = createObject("roUrlTransfer")
 request.setURL(url)
 response = request.getToString()
 return response
end function

But to use a DELETE or PUT request you need to set the request type as well as using the asyncPostFromString or postFromString call. So to use a PUT use something like:

function httpPutRequest(url as String, body as String) as Void
 request = createObject("roUrlTransfer")
 request.setURL(url)
 request.setRequest("PUT")
 request.postFromString(body)
end function

Or similarly a DELETE:

function httpDeleteRequest(url as String, body as String) as Void
 request = createObject("roUrlTransfer")
 request.setURL(url)
 request.setRequest("DELETE")
 request.postFromString(body)
end function
Mood

Exiting out of a Brightscript SceneGraph application

To exit a a SceneGraph application you have to complete executions of your main method. A nice easy way to do this is to observe a field on your scene and then fire a roSGNodeEvent via the port (Once you’ve read this you can download a full working app that demonstrates the below here. It’s pretty sweet).

You’ve probably got something like the following in your main app brs file.

screen = CreateObject("roSGScreen")
m.port = CreateObject("roMessagePort")
screen.setMessagePort(m.port)
scene = screen.CreateScene("mainScene")
screen.show()
scene.setFocus(true)

while(true)
  msg = wait(0, m.port)
  msgType = type(msg)

  if msgType = "roSGScreenEvent" then
    if msg.isScreenClosed() then
      return
    end if
  end if
end while

This would exit out if you clicked back on the RCU when the scene is focused as msg.isScreenClosed() would be true - but what if we wanted to close the app on another event? It’s actually pretty simple to do. The main challenge is exiting out of the while loop. A handy way is to add an observer to the scene and pass the port as the handler.

You could modify this main screen to look something like:

screen = CreateObject("roSGScreen")
m.port = CreateObject("roMessagePort")
screen.setMessagePort(m.port)
scene = screen.CreateScene("mainScene")
screen.show()
scene.observeField("exitApp", m.port)
scene.setFocus(true)

while(true)
  msg = wait(0, m.port)
  msgType = type(msg)

  if msgType = "roSGScreenEvent" then
    if msg.isScreenClosed() then
      return
    else if msgType = "roSGNodeEvent" then
      field = msg.getField()
      if field = "exitApp" then
        return
      end if
    end if
  end if
end while

By adding the observer scene.observeField("exitApp", m.port) on the scene a roSGNodeEvent msg will fire on m.port when we change the exitApp interface field. It’s a nice succinct way of handling this.

Set up your MainScene.xml so it has an observable interface boolean field called exitApp or similar:

<?xml version="1.0" encoding="utf-8" ?>

<component name="MainScene" extends="OverhangPanelSetScene" >
    <interface>
        <field id="exitApp" type="boolean" value="false" />
    </interface>

    <children>

    </children>
    <script type="text/brightscript" uri="pkg://components/MainScene.brs" />
</component>

Then you need to setup your MainScene.brs to alter the exitApp variable on an OK click:

function init() as Void
    print "ExitApp"
end function

function onKeyEvent(key as String, press as Boolean) as Boolean
    if key = "OK" then
        m.top.exitApp = true
    end if
end function

Download the source for this here.

Mood

How to calculate how much texture memory an image will use on a Roku box

Ever found your Roku app running sluggish or even crashing? If you’re building an image heavy application you may be bumping up against your texture memory limits. Since Roku introduced SceneGraph there have been massive improvements in memory handling and a visible reduction in crashes over apps that use SDK1 but have you ever wondered how to calculate how much texture memory an image will take? (Probably not you say? Well I’ll tell you how anyways).

It’s actually fairly simple and comes down to the dimensions of the image rather than any kind of compression technique.

To figure out how much texture memory an image will use in kilobytes just use the following formula (where numberOfChannels is always 4 - RGB and alpha):

(width * height * numberOfChannels) / 1024

To get megabytes just divide by 1024 again.

So if you had an image of dimensions 1280 x 720 you can calculate that this will take up:

(1280 * 720 * 4) / 1024 = 3600 kBs (Approx 3.5 mBs)
Mood